Overclocking the LC 475 in Software
If you want to dive right in, it is recommended that you download and install the Control Strip Module version as this has the most up to date version of the software. The Control Strip Module version works in Systems from 7.1 through to 8.1, and supports overclocks in 24 bit addressing mode (my extension currently doesn’t). It also has better memory timings, and can often overclock slightly faster. It even has slightly different timings for the LC 475 and LC 575, to account for the difference in onboard memory speed. You can find a copy of the latest version on Macintosh Garden : https://macintoshgarden.org/apps/control-strip-475-overclock
The overclock is specifically designed to work with the stock 80ns RAM and VRAM in an LC 475 (etc.) And 70ns RAM in an LC 575.
A little while ago Mustermann posted on the 68kmla forums that he was doing some experiments relating to overclocking the LC 475 without any hardware modifications. This was being achieved by controlling the LC 475’s programmable clock from the LC’s memory controller. The same process is possible on similar hardware such as the Q605 and LC 575.
Mustermann was kind enough to share his source code, and so zigzagjoe made an extension version for a fixed speed of 40MHz. Using Mustermann and zigzagjoe’s code as a basis, plus code from cheesestraw’s github, I started extending the functionality of the extension, including adding boot-time status icons, the ability to dynamically generate parameters based on a target clock speed and the ability to read instructions from the resource fork. I then made a control panel (actually a small application programme) to present user friendly interface for changing the extension’s settings.

An initial version apparently worked on some people’s 475s, but only allowed 20, 25, 33 and 40MHz on my own LC 475. After much digging, Mustermann was able to work out that I was providing values in an incompatible format to his magic sauce function that set the arbitrary speeds. This was fixed and now means I’m happy that the extension works as expected and so find enclosed the current version of the software installer :
(Updated to Version 0.5.2 on 23rd October 2024)
The latest version, 0.5.2, is mostly identical to version 0.5.1, other than it contains a bug fix in the Advanced mode, where previously the Max and Min values were not being correctly saved.
Requirements
- An LC 475, Performa 475, Quadra 605, Performa 476, LC 575 or Performa 577
- Mac OS 7.5 or later.
- Do not use this software if you have replaced the speed setting resistors on your logic board with blobs of solder. You really shouldn’t do this, and I don’t expect people have, but if someone has, it may cause damage (not limited to in conjunction with this software).
Optionally…
- A heatsink for your CPU.
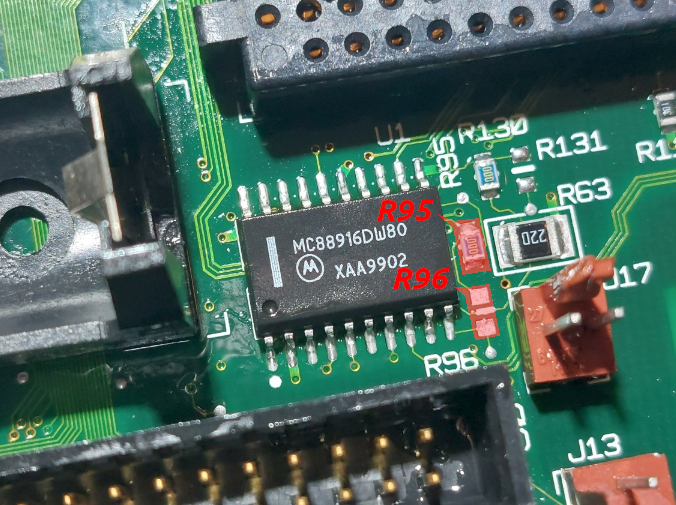
- Move the zero ohm resistor at R96 to the R95 position to adjust the SCSI clock for 33MHz and above on LC 475 style logic boards. Not on the LC 575 type board, it already is set up for faster speeds.
- A faster grade CPU.
Using the Software
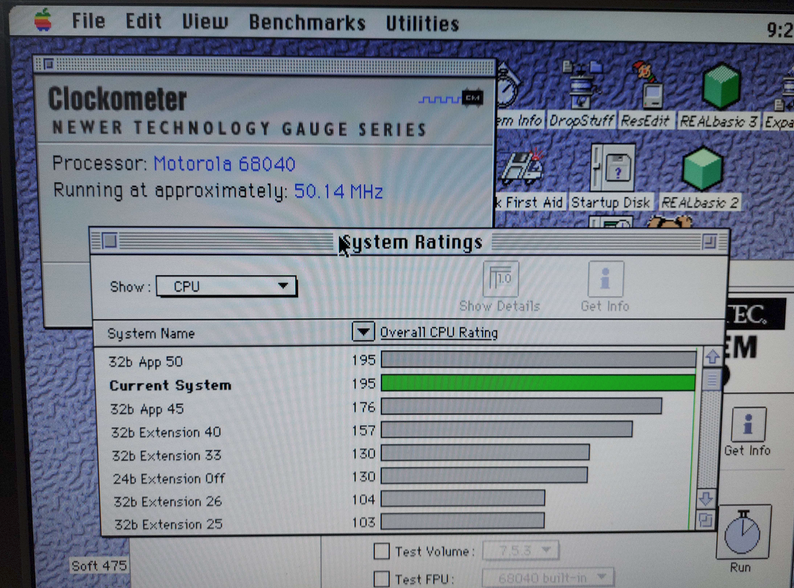
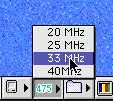
This .bin file contains an installer to run on your LC / Performa. It is pretty self explanatory. Once you’ve installed it, the software is “off” by default, so you’ll need to go to the “Soft 475 OC Setup” control panel and select what speed you want to try to run your computer at. This software will only work on the LC 475, Quadra 605, LC 575 and their Performa Equivalents. It may also work on the Apple STB. For an initial test, try selecting 33MHz from the menu, click “Set”, and then restart. Use Newer’s Clockometer software to verify the speed has taken. If this works, try 40MHz. If the computer crashes, or otherwise shows signs that it isn’t able to run at 40MHz, power off the computer, and power back on while holding the shift key to disable extensions. Once the computer has booted, use the control panel to set the overclock back to 33MHz or another speed known to work.
With some additional hardware modifications, namely changing the SCSI clock, replacing the clock multiplier with a higher grade chip and swapping in a higher grade CPU, I was able to get my LC 475 to run at 50MHz.
Selecting “Custom” from the “Select Speed” popup menu allows you to enter an arbitrary speed, recommended to be between about 20 and 40MHz, but depending on your exact configuration you might be able to go outside these bounds. You can enter fairly granular speeds, for example 37.6MHz, although Clockometer and other speed calculating software often isn’t accurate to this degree.

The “Advanced” option isn’t recommended unless you’ve read and understood the clock generator chip’s datasheet, but is there for users who want to exactly tweak parameters. Entering values in this dialogue box without understanding them will very likely just crash your computer.

LC 475 SCSI Clock Modification
For best compatibility while overclocking the LC 475 and other machines with the same logic board (not the LC 575 etc., which shipped with this modification as stock), it is beneficial to move the resistor located at R96 to the empty R95 position. This divides the SCSI clock by two and brings it back within specification. Note that this does not halve the performance of your SCSI bus. If you don’t do this modification, some people find that their computer crashes during large file copies, even at speeds as low as 33MHz. With this modification, the SCSI clock is within specification all the way up to 50MHz… if your computer still crashes, the issue is more likely your RAM (including onboard), VRAM or CPU grade. The good news is that all of these can be replaced with faster parts, although replacing the soldered RAM is a little tricky.
Potential Issues
When overclocking, sooner or later you will hit the limits of your hardware.
The first limit you reach is likely to be the SCSI clock on the LC 475 (not the LC 575, which is already set for higher speeds), meaning you’ll need to do the SCSI clock modification identified above. After that, you might want to fit a faster CPU, VRAM and RAM. Removing the RAM soldered to the logic board can help, and you don’t need to solder new RAM onto the board if you don’t want to, as long as you have a SIMM fitted. Remember the LC 475 can work with SIMMs up to 128MB in size, so the onboard RAM isn’t too critical.
I have also fitted an MC88916DW80 in place of the original XC88920 to hopefully improve performance at high speed. These can be bought from your favourite Chinese online retailer, although be cautious of re-labelled parts.
Once you exceed 40MHz, there will come a point at which you may have issues with the serial ports and floppy drive. I haven’t done extensive testing of this myself yet.
Note that most 25MHz 68LC040 CPUs will happily overclock to at least 33MHz, although it is always good to fit a heatsink. It is generally not a good idea to run an LC 475, and especially an overclocked one, with the lid off as the lid helps ensure airflow over the CPU and other components.
Future Development
Moving forward I’d like to add some more features and tidy up the user interface. Things I’d like to add include…
- On the fly clock speed changes.
- Estimated current speed display.
- Holding numeric keys during boot sets predefined clock speeds.
Coming Soon… Cancelled
Version 0.6 was undergoing testing and has some cool new features, including the ability to set independent speeds for your 68040 and PPC601 if you have a PowerPC upgrade… which I don’t.
- On the fly clock setting.
- Independent speeds for 68040 and PPC.
- Built in speed estimation.
- Hopefully improved user interface.
- Included speed change XCMD for use in your own projects.
- Reduced file size for easy install from 800k floppy disks (possibly even 400k, depending on how much formatted space they have).
- Technical improvements to ensure you don’t accidentally run the wrong control panel with the wrong extension.
- A shutdown item that sets the speed back to the default for your computer, or you could just leave it on your desktop to reset to the baseline frequency manually.
- Some pretty icons.
- A visual indication of whether you are currently booted as a 68k or PPC Mac.

Sadly I’ve been unable to get the PowerPC upgrade specific code tested, as multiple months have passed I’m moving on from the project.
However…
… I made a Control Strip Module which allows on the fly speed switching (i.e. without needing to restart). I found this very helpful template to use.
The control strip module can be downloaded here. https://macintoshgarden.org/apps/control-strip-475-overclock
Thank you to the author of CSShell for permission to release it.
Feedback
Please let me know if this software works well for you. The github project can be found here the actual download for the software is near the top of this page and you’ve scrolled past it. Feel free to use the software as the basis of your own projects.