Creating a Disc Image of a Classic Mac OS Bootable CD
The most important thing when making bootable disc images is to test them. After you create your disc image file and before you upload it anywhere, make sure you burn it back to a CD and test it On Real Hardware. If you do not have an appropriate vintage computer, speak to a friend that does. There are so many mistakes that it is possible to make that in a recent review, approximately one third of images uploaded to an archive page had been rendered un-bootable in some way. While testing takes a little time, it is nothing compared to the time a bad image wastes for dozens of users downloading it, to say nothing of the frustration it causes new users who may not have the experience to realise what the issue is.
NOTE – If your source CD contains true multimedia (for example, data and CD Audio, like many game CDs from the 90s), you very likely will need to create a bin + cue image of the source. I’m aware that a lot of people don’t like these, but sadly, there is no alternative that I know of. Genuinely, bin+cue isn’t a superfluous format designed to annoy you, it has a specific purpose and some CDs can not be properly burnt to new discs without it.
Classic Mac OS
Toast
Warning, this method likely very slightly modifies the CD, but other methods, using other options within Toast, will significantly modify the original content of the CD, rendering them less useful or even unbootable on any system, so this is the best you’re going to get! Do not use the “Mac Volume” option!
Launch a copy of Toast in Classic Mac OS, I’m using Toast 4.1.3, running on Mac OS 7.5.5 as an example.
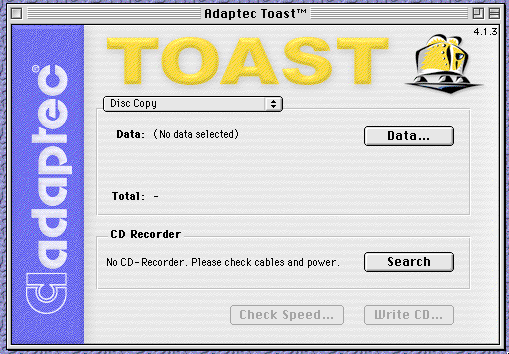
Select “Disc Copy” as the operation type in the window. Then click the “Data…” button and select the disc you want to copy.
From the File Menu, select “Save as Disc Image…”. Save the file, conventionally as a “.toast”, but this file can actually be treated as a “.iso” file by many good CD burning programs.
Current macOS
NOTE – You will need an external optical drive as recent Macs do not come with a built in optical drive.
With a GUI
Disk Utility
Warning, this method likely very slightly modifies the CD. If a better alternative method is known, please propose it and I will add it here.
Launch Disk Utility, select the disc (not the partition – you must select the top level of the device you are trying to copy). Then select “Image From <device name>…” from the File menu.
Under the “Format” popup menu, select “DVD/CD Master” and ensure that no encryption is applied. Navigate to where you want to save, enter an appropriate file name and click save.
The resultant “.cdr” file can actually be treated as an “.iso” and can be renamed and burnt with many good CD burning programs.
AARU
I am not familiar with this software, but it can apparently also produce a good disc image.
With the Command Line
dd
To save a disc image of your CD to your desktop, first you need to work out what the Operating System calls your CD Drive. To do this, launch Disk Utility, and click on the optical drive top level.
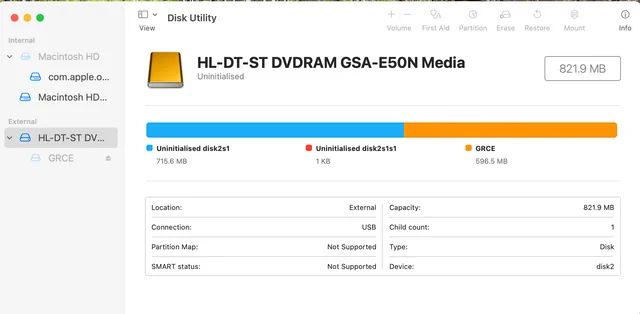
This will display some information about the drive, including, as shown above, in the lower right hand corner “Device”, which is in the example given “disk2”. This is your Device Name.
Alternatively, this information can be obtained by typing “diskutil list” (without the quotation marks) and pressing enter in a Terminal window and identifying the optical drive by its description. There will usually be an entry for “disk#” where # is a number, and then a number of additional entries with the same name, followed by “s#”, again where # is a number. Each of these additional entries are partitions on the disk. What we want is the top level name, so the one in the format “disk#”. This is your Device Name.
In a Terminal window, type “cd ~/Desktop” (without the quotation marks) and press enter. This will change the current directory to the desktop folder of the current user. Then, very carefully (making sure that there isn’t already a file called “cdimage.iso” on your desktop – if there is, you can change the filename in the following command (it is generally best to avoid spaces to keep things simple)), using the Device Name obtained above in place of the text “<disk#>”, enter the following command :
dd if=/dev/<disk#> of=./cdimage.iso bs=2048
This command will copy the “if” (input file) to the “of” (output file) with a “bs” (block size) of 2048 bytes. This should give us a nice pure and unadulterated disc image of the CD.
dumptoiso
I’ve not tested this script, but the following has been designed to simplify the process with dd :
https://macintoshgarden.org/apps/dumptoiso-a-script-os-x-dump-cds-and-dvds-iso-files
Older Versions of Mac OS X
In older versions of Mac OS X, it is possible to use methods similar to the “Toast” instructions given for Classic Mac OS, or for “Disk Utility” for current macOS, with minor interface differences.
Command line instructions remain effectively identical to current macOS instructions above when using dd in older versions of Mac OS X.
dumptoiso, linked above, also works back to 10.3, if not earlier.
Linux
With a GUI
Install the application “K3b”.
Launch and select the “Copy Medium…” option from the “Tools” menu.
Verify the correct drive is selected in the “Source Medium” popup menu, make sure “Copy Mode” is set to “Normal Copy”, and check the “Only create image” checkbox.
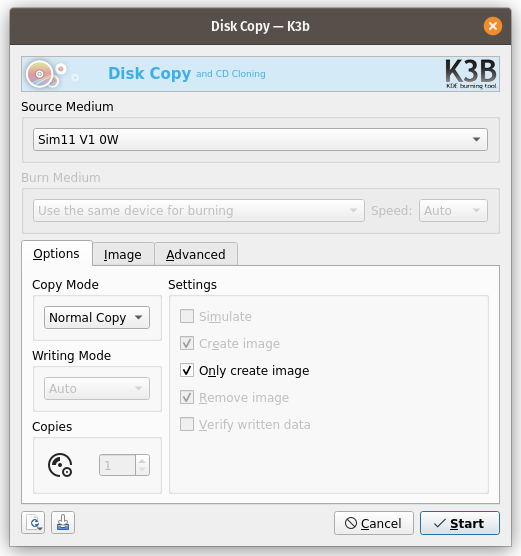
Switch to the “Image” tab and enter a filename and path.
Click “Start”.
You should now have a disc image of your CD saved at the location you selected. When burning Mac HFS images from K3b it will complain that it does not recognise the format. Don’t worry, just dismiss the dialogue box and continue.
With the Command Line
To save a disc image of your CD to your desktop, first you need to work out what the Operating System calls your CD Drive. To do this, you can launch you disk management application such as gparted or “Disks”.
This will display some information about the optical drive, including the “Device” path, which on my computer is “/dev/sr0”. This varies more on linux than on other platforms, depending on the flavour of linux you run. This is your Device Name.
Alternatively, this information can be obtained by typing “df -h” (without the quotation marks) and pressing enter in a Terminal window and identifying the optical drive by its description. If there are multiple partitions mounted, what we want is the top level name. This is your Device Name.
In a Terminal window, navigate to the location you want to save your disc image. Then, very carefully (making sure that there isn’t already a file called “cdimage.iso” at the location – if there is, you can change the filename in the following command), using the Device Name obtained above in place of the text “<device>”, enter the following command :
dd if=/dev/<device> of=./cdimage.iso bs=2048
This command will copy the “if” (input file) to the “of” (output file) with a “bs” (block size) of 2048 bytes. This should give us a nice pure and unadulterated disc image of the CD.
Windows
ImgBurn
After installing ImgBurn, launch the application and select “Create Image file from Disc”.
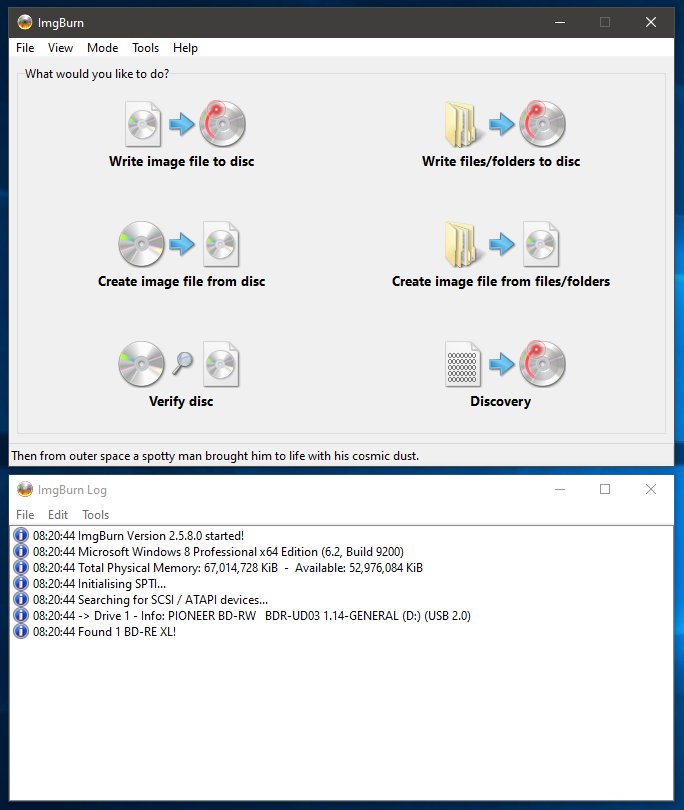
Insert the disc you want to copy and select a destination.
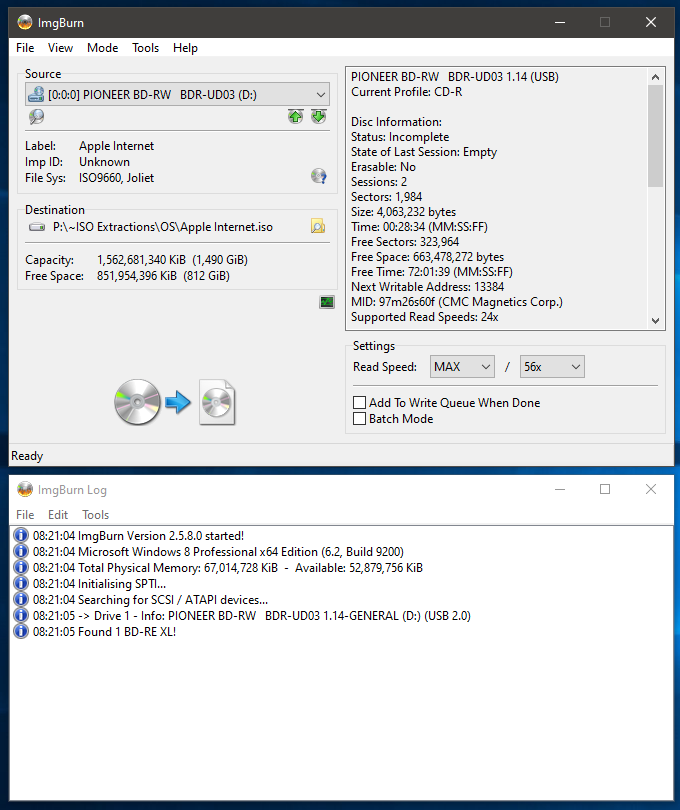
Click on the CD to file pictograph / button (that doesn’t look one bit like a button, and shown below for clarity) and ImgBurn will create your disc image.

The display will change to show progress and a message appears on screen once the process has completed.