A simple application using BeIDE
Introduction
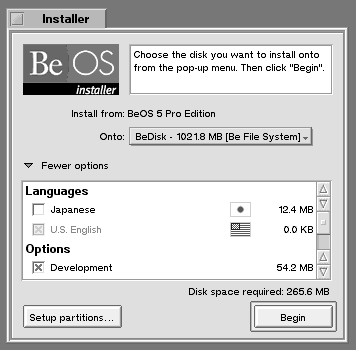
Assuming that you selected the “Development” option in the main window of the BeOS 5.0.3 PE installer, you will already have a lightweight IDE (Integrated Development Environment) installed.
This IDE is actually a cut-down version of MetroWerks’ CodeWarrior IDE, something that anyone who was programming for the classic Mac OS operating system in the beige PowerPC days will remember. The IDE still exists, but is more commonly used for embedded platforms these days and is now owned by NXP. Over the years it has been used as the a development platform for several games consoles such as the Playstation and Playstation II, the GameCube, DS and Wii as well as various other platforms.
Setting Up a New Project
Go to the BeOS menu, “Applications”, and select “BeIDE”. What looks like an empty text document will open.

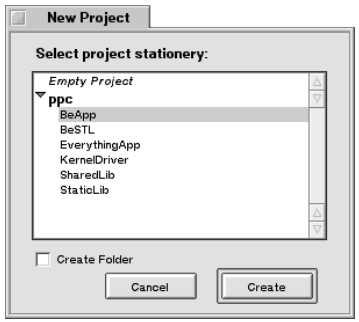
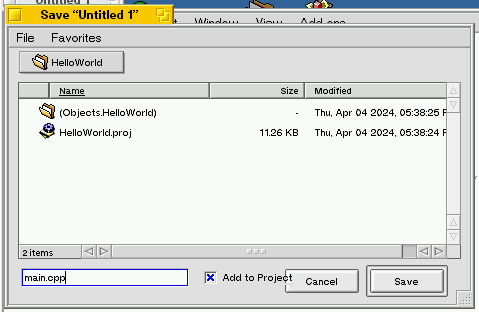
From the “File” menu, select “New Project”. You will be presented with a dialogue box to select your project stationery (template). For now, select “BeApp”, check the “Create Folder” option and click “Create”. In the Save New Project dialogue box, navigate to your home folder, long click (or control+click) in an open area of the navigation panel (you may need to grow the window to find some white space) and create a new folder called “Development” or similar. Open this folder, and save your new project as “HelloWorld.proj”.
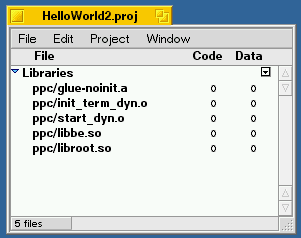
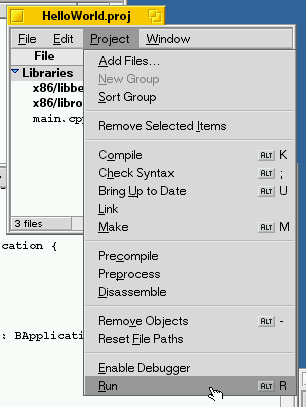
At this point you should have two BeIDE windows on the screen. An empty text document, and “HelloWorld.proj” (ignore the “2” in my upcoming screenshot) with a number of libraries included by the stationery.
The following C++ code has only trivial changes from the example given in the first chapter of the book “Programming the Be Operating System” by Dan Parks Sydow, which the publisher, O’Reilly, has kindly made available for free here. This book is recommended for starting to learn C++ programming for BeOS.
#include <Window.h>
#include <Application.h>

class SimpleWindow : public BWindow {

public:
            SimpleWindow(BRect frame);
   virtual  bool QuitRequested();
};

// "Hello World!" in the following line is the text which will show as the window title.
SimpleWindow::SimpleWindow(BRect frame) : BWindow(frame, "Hello World!", B_TITLED_WINDOW, B_NOT_RESIZABLE)
{
}

// The following overrides the default behaviour for when a window is closed to add
// the call to quit the entire application, rather than just close the window.
bool SimpleWindow::QuitRequested()
{
   be_app->PostMessage(B_QUIT_REQUESTED);
   return(true);
}

class SimpleApplication : public BApplication {

public:
            SimpleApplication();
};

SimpleApplication::SimpleApplication() : BApplication("application/x-vnd.ele-simpleapp")
{
   // This code executes when the Application Object is created, and so it is a
   // good place to create our window in this very simple program.
   SimpleWindow *aWindow;
   BRect        aRect;
   aRect.Set(20, 40, 200, 60); // this is the windows location and size,
                          // x, y, w, h. Note the y doesn't include the window's tab.
   aWindow = new SimpleWindow(aRect);

   aWindow->Show();
}

int main()
{
   SimpleApplication myApplication; // create the Application Object

   myApplication.Run(); // set it running

   return(0);
}
Enter the provided code in the empty text document. Double check it to make sure there are no errors. White space is fairly flexible in C++ so it wont mind how many spaces or tabs you use between things. Once you are happy, got to “File” and select “Save As…”. Name the file appropriately (I called mine “main.cpp”), check the “Add to Project” option and save it into your project folder. The saved file should appear in the BeIDE project window along with the Libraries that were imported by the stationery. Close the text window you entered the code into for now.
Now we have actually finished (although completely unexplained) our first application, and we can build and run it by selecting the “Run” option from the “Project” menu in the project window.
If everything goes well, you should see your first BeOS application appear in the top left of the screen! It should look something like the following :

In progress…